
Designing a small bathroom that is both stylish and accessible is not just about making adjustments — it’s about creating a safe, functional space that promotes independence and dignity for people with limited mobility. Whether you’re modifying a bathroom for an elderly family member, someone recovering from surgery, or a wheelchair user, there are practical strategies that make a big impact even in tight spaces.
1. Understanding the Needs
Before making changes, assess the specific mobility challenges the user faces. Are they using a wheelchair or walker? Do they require assistance with bathing or toileting? Understanding these details helps prioritize modifications.
- Wheelchair users need enough space for turning and maneuvering (at least 150 cm or 5 feet in diameter).
- People with balance issues benefit from sturdy support surfaces and anti-slip materials.
- Arthritis or limited reach may require lower, easier-to-access fixtures.
A consultation with an occupational therapist can help tailor the space to real-world use.
2. Optimizing Layout in a Small Bathroom
In a compact bathroom, every inch matters. Your goal should be to eliminate clutter, maximize mobility, and streamline access to essential fixtures.
Tips to optimize layout:
- Use wall-mounted sinks and vanities to create open floor space and allow wheelchair users to roll under.
- Swap traditional doors for sliding or pocket doors, which free up swing space.
- Mount shelves vertically and keep only essential items at reachable heights.
- Avoid unnecessary decor or bulky items that may obstruct movement.
Where possible, rearrange the toilet, sink, and shower to create a clear path of circulation.
3. Flooring and Surface Safety
Slippery floors are one of the biggest hazards in any bathroom — even more so for people with limited mobility.
Best practices:
- Install non-slip flooring, such as textured tiles or anti-slip vinyl.
- Avoid rugs or mats that can shift underfoot. Use slip-resistant versions with rubber backing.
- Ensure that floors are leveled throughout the bathroom to prevent tripping.
Moisture-resistant materials also help minimize mold and mildew, which are not only unhygienic but also reduce traction.
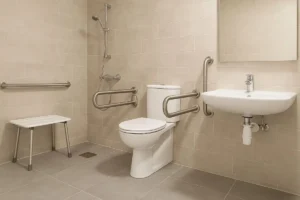
4. Showers and Tubs: Accessible Bathing Solutions
Showers are often the trickiest area to modify in small bathrooms, but it’s possible with smart planning.
Recommended options:
- Install a curbless (walk-in) shower with a wide, level entry.
- Include a fold-down seat or built-in bench.
- Use a handheld showerhead mounted on a sliding rail for adjustable height.
- Add grab bars near the entry, seating area, and controls. Make sure they are firmly anchored to support body weight.
If a tub is necessary, consider a walk-in bathtub with a door and seat — though these require more space than a roll-in shower.
5. The Right Toilet Setup
Toilets should be safe, comfortable, and accessible.
Modifications to consider:
- Replace the toilet with a comfort-height model (17 to 19 inches seat height).
- Alternatively, add a raised toilet seat attachment.
- Install grab bars on both sides of the toilet for extra support during transfers.
- Leave at least 18 inches of clear space from the wall to either side of the toilet if a wheelchair needs to approach sideways.
For those who need help with hygiene, consider installing a bidet seat or a toilet with built-in washing functions.
6. Accessible Sink and Vanity Design
The sink area must be easy to approach and use.
Smart sink upgrades:
- Choose a pedestal or wall-mounted sink to allow wheelchair access underneath.
- Ensure plumbing is insulated or enclosed to prevent burns.
- Use lever handles or motion-sensor faucets, which are easier for people with limited hand strength.
Avoid under-sink cabinets that block knee clearance. If storage is needed, mount shelves at reachable levels nearby.
7. Lighting and Visibility
Good lighting not only increases safety but also supports independence.
Lighting upgrades:
- Use motion-activated lights that turn on when someone enters.
- Install LED strip lighting under vanities and around mirrors for better visibility.
- Choose light switches that are large and placed lower on the wall for easy access.
Also, consider contrasting colors between the floor, walls, and fixtures so that visually impaired users can distinguish zones easily.
8. Grab Bars: The Essential Detail
No accessible bathroom is complete without strong, properly placed grab bars.
Placement tips:
- Next to the toilet for support during sitting or standing.
- Inside the shower, both horizontally and vertically for stability.
- Near the entrance of the bathroom, if balance support is needed.
Make sure they are installed according to ADA (Americans with Disabilities Act) guidelines or local accessibility standards.
9. Storage and Accessibility
Storage should be intuitive, reachable, and non-intrusive.
Ideas for better storage:
- Use open shelves or baskets mounted at arm level.
- Install pull-out drawers instead of cabinets.
- Keep daily-use items close to the sink or toilet.
Avoid placing anything in floor space where it could become a tripping hazard.
10. Aesthetic Considerations: Accessible Can Be Beautiful
Accessibility doesn’t mean compromising style. With thoughtful material choices and design planning, you can create a bathroom that feels modern, elegant, and tailored.
Design tips:
- Use natural textures, calming colors, and minimalist design to reduce visual clutter.
- Match the hardware finishes (grab bars, faucets, handles) for a cohesive look.
- Incorporate mirrors to visually expand the space.
Accessibility and beauty can go hand-in-hand when comfort and creativity guide the process.
Final Thoughts
Adapting a small bathroom for someone with limited mobility can be challenging, but it’s far from impossible. With careful planning, functional choices, and user-focused design, even the tiniest space can become a safe, elegant, and empowering environment.
This thoughtful approach not only ensures safety and comfort but also enhances the dignity and autonomy of those who use the space — turning a functional room into a place of true well-being.